In previous posts we covered topics such as getting your data out of Yardi using the FTP method and the Log shipping method to facilitate building your own custom reports outside of the tool and being able to combine the data with other operational data sources. The tool comes with a comprehensive set of reports but there is always a need to create custom reports to supplement the book of reports. The tool also gives the ability to build your own SSRS reports and place them back in the tool so that they appear in the SQL Reports section for all users to access. Below we will cover the basics on Creating Embedded Yardi SSRS Reports Tutorial.
SSRS reports in Yardi require two files – a text file containing your SQL, and an RDLC containing the report definition.
If the contents of this post are outside of your wheelhouse, don’t worry, this is why I started CREXchange.io to help clients get up and off the ground with Yardi Data Integration and Advanced Power BI Custom Reports to help run your CRE business. Contact us there for more details or a demo!
The SQL File
The SQL file will contain most of the necessary primary elements and logic. It’s where you will define the title, the filters, the columns and most importantly the SQL statement.
In the filters section (marked //Filter), you can specify the parameter type, data type, caption, values and other attributes for the report. This section is what the Yardi SSRS module uses to create the parameter section before you run a report, not what is in the RDLC. Note: Creating a parameter in the RDLC can cause the report to run into errors.
The SQL is written as regular T-SQL and users must have a working understanding of the tables and data elements to be sure they are writing accurate queries. In the “Where” clause, the filters set up in the previous section can be referenced using hashmarks. (Example: Where Property = #Property#). The filter in the hashmarks will be replaced with the correct value at run time.
Once created, save the file as SampleReport.SSRS.txt – the naming convention is needed for the tool to know how to render the report.
The RDLC File
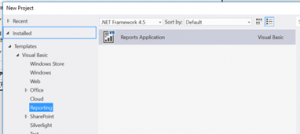
The second file you’ll need is the RDLC, which can be created in Visual Studio 2012. (The version is important, as later versions of Visual Studio may create rendering errors. I’ve had issues with filters working correctly.)
From new projects, you will want to create a VB Reporting Application project. This is usually included in the default installation.
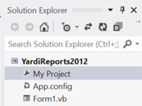
Once created, skip or cancel all the wizards that pop up. We will be creating all items manually, as it is fairly simple. Once the project is created, you will see the solution on the right-hand side.
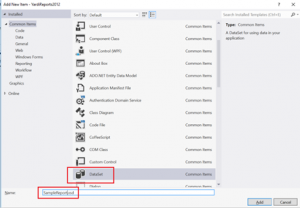
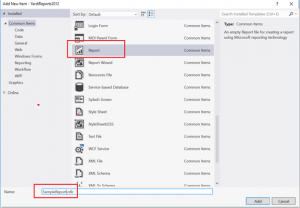
Right-click the solution and click “add new Item.” We will be adding a DataSet first. Be sure to the name matches the name on the report. Although not critical, it helps later with tracking your SQL.
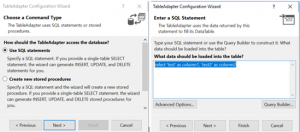
Once created, you will find tool box on the left side of the page. Grab “Table Adapter” and drag it into the work space. Then, create a SQL Connection. This will give you a local database to write and test your queries against. Do not worry about the connection string, this does not get used at run time when you deploy. (NOTE: If you are not on a VPN or network where you can connect to a Yardi database, then you will need to follow the steps from our previous blog posts on getting your data out of Yardi.)

On the next step of the Wizard, select “Use SQL Statement”. Add your SQL here, but do leave off any non SQL formatting such as the Hash tag filters. Just the Raw SQL that returns the columns needed should be placed here so the report can create the metadata needed for the report render. We just used two test columns here for the example.
Once the Table Adapter is created, it will appear in the “Solutions” section. Add another “New Item.” Select “Report” – also giving it the same name as the data connector and the SQL text file, just to keep things clean.

Once you have the RDLC file created, you can create the report using typical SSRS development skills (those instructions can be found in basic Microsoft training material online). There’s no need to add parameters or filters, since that’s handled via the text file. Only the table data and layout items need to be defined at this stage.
Once both files are created, they need to be uploaded to the server using Client Central. This is done by an administrator with access to the front-end. The folder and location will be specific to your file system. Be sure the files are added to the correct section and to the correct environment test or production, based on your goals.
That is it! Once uploaded, your report should be searchable via the SQL Reports menu item. Complex reports can be created as long as you have a good power user. The limit of what you can do is only limited to the skill of the report writer.