The first process in any data warehouse project is obtaining the data into a staging environment. In the traditional data warehouse, this required an ETL process to pick up data files from a local folder or FTP, and in some cases, a direct SQL connection to source systems to then load into a dedicated staging database. In the new process we will be defining we will be using an S3 bucket to be our new staging environment. Staging data will forever live in raw file data, as any analysis or query needed against this data will be handled via tools like Athena or Elastic Map Reduce which we will cover later. Keeping this data in S3 (known as Azure Blog storage in the Microsoft world) is a cheap and convenient way to store massive amounts of data for a relatively low cost. For example, the first 50 TB is stored at a cost of $0.023 per GB. In most use cases we can assume our data requirements stay under this threshold so if we are assuming 1 TB of data files, we can ball park around $23 a month for storage or $276 a year. Pretty cheap.
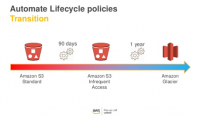
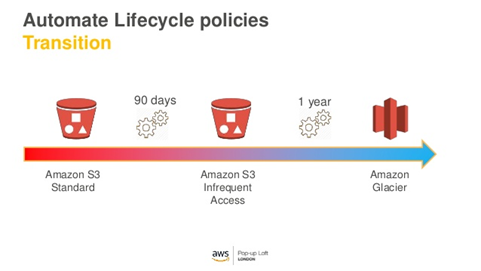
S3 also offers classes of storage that get cheaper with less readability needs. Data can be moved from S3 Standard which is high availability to S3 infrequent access which is cheaper but also has slightly slower read/writes. Very old data can then be moved to S3 Glacier which is the cheapest of the classes but also is very slow on access and restore. Processes can be defined around your data rules to maximize your storage vs. cost. We will walk through that process in a later post as well. For now, we will work in S3 Standard since the cost is already low.
So, let’s get into it. Here are the steps required to automate data from a local folder to you first S3 bucket!
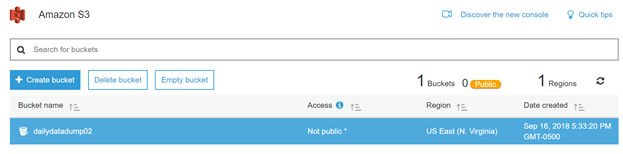
- You will need to create your first S3 bucket in the AWS console. For more details, please see the AWS documentation. We will call this bucket “DataDump002”. No need for anything fancy just yet.
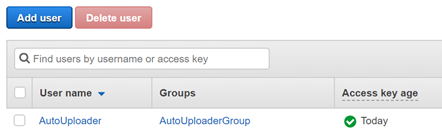
- The next step will be setting up the right access to the bucket from a newly created IAM user. For this, navigate to IAM in AWS and create a new user. I called mine “AutoUploader”, put it in a group called “AutoUploaderGroup” and set its permission to “AmazonS3FullAccess”
- Be sure to copy the ARN as well as the Key and Secret Key.
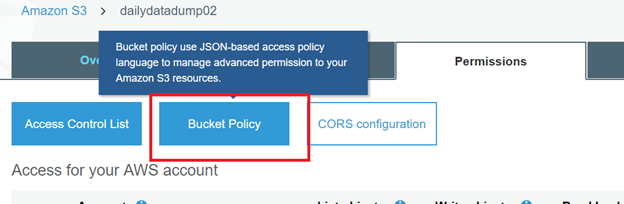
- From here, navigate back to your S3 Bucket and click on your bucket to get to the details and click on Bucket Policy. This is where you will define the JSON string that grants the correct permissions for read write. This step is a bit tricky as the Policy Generator in the IAM tool can create some odd rules and cause some errors if the bucket is empty vs. a dummy file being in place. Please see my JSON below for a working sample. Replace what is in BOLD for the ARN for your IAM user and the bucket. If you get errors saving this rule, remove all items from the Action section except the Get and Put, and add them back in once you have data in the bucket at a later time.
- JSON Policy for Bucket
{
“Version”: “2012-10-17”,
“Id”: “Policy1537137960662”,
“Statement”: [
{
“Sid”: “Stmt1537137433831”,
“Effect”: “Allow”,
“Principal”: {
“AWS”: “arn:aws:iam::123456789:user/AutoUploader“
},
“Action”: [
“s3:Get*”,
“s3:Put*”,
“s3:List*”,
“s3:ListBucket”,
“s3:ListBucketVersions”
],
“Resource”: “arn:aws:s3:::dailydatadump02“
}
]
}
- That should be it for the set-up portion on AWS. For the next section you will need to download and install AWS Command Line Interface which can be found using a Google Search. Once installed, you will need to restart your machine.
- Once restarted, run the command “AWS Config”.
- You will be promoted for your key and secret key from Step 2.
- Enter the region your AWS was set up in. The S3 buckets do not require a region. Mine was set to us-east-1.
- Set output to “text”
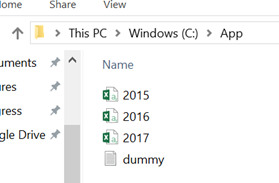
- For this example I created a local folder on my C drive and dropped 3 big data files I downloaded with data surrouding the world happiness index which is free to download from https://www.kaggle.com/
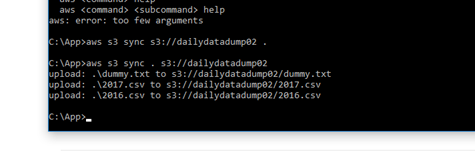
- From here all you need to know is the following two commands.
- aws s3 sync . s3://dailydatadump to sync files from your local folder to your bucket
- aws s3 sync s3://dailydatadump . to sync files from your S3 bucket back to your local folder
- The sync command works a lot like the XCOPY command in regular BAT file command prompt. Files that exist and are unchanged will be skipped and save you the processing time.
- That’s it! A few small tweaks and this can now be set as BAT file and scheduled to run every few minutes to keep data files flowing to your S3 bucket for all your future data analysis needs!