Now that we have provisioned a Event Hub in Azure, let’s Create a NodeJS Client Application to Submit Data to Event Hubs.
Prerequisites
- Visual Studio 2017
- Install NodeJS SDK

Now that we have provisioned a Event Hub in Azure, let’s Create a NodeJS Client Application to Submit Data to Event Hubs.
Prerequisites
Provisioning an Azure Event Hub to capture real time streaming data is fairy easy once you have an Azure account. Event Hubs can be used to capture data from many different sources including databases or IoT devices. As we look at building a CDC streaming ETL, let’s take a look at the basics of Event Hubs
The modern data warehouse will need to use Azure Data Lake and U-SQL to combine data. Begin by navigating to your Azure Portal and searching for the Data Lake Analytics Resource. Let’s start by creating a new Data Lake. Don’t worry, this service only charges on data in and out, not just remaining on like an HDInsights cluster so you should not be charged anything and we will not need to spin up and spin down services like we did earlier.
In previous posts we have looked at storing data files to blob storage and using PowerShell to spin up an HDInsight Hadoop cluster. We have also installed some basic software that will help us get going once the services are provisioned. Now that the basics are ready, it is time to process some of that data using Hive and Visual Studio. In this scenario, we will be loading our Happiness Index data files into Hive tables and then consolidating that data into a single file.
Two tools that are going to make life a bit simpler if you are going to be working with HDInsights and Azure blog storage are “Azure Data Lake and Stream Analytic Tools for Visual Studio” and Azure Storage Browser.
Azure Data Lake and Stream Analytic Tools for Visual Studio

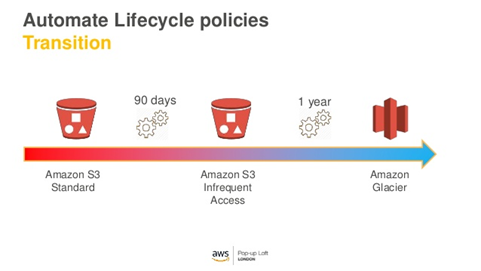
I wanted to keep this post short since as I mentioned in the previous post about cloud storage, our use case is already an affordable one, but it still makes sense to touch on some of the file movement strategy to other tiers of storage to make sure we are maximizing our cost saving vs. our base level requirements. In S3, you can easily define life cycles rules that allow you to move your files from standard storage, to infrequent and eventually cold storage. The different pricing structures can be found on AWS’s documentation located here.
The first process in any data warehouse project is obtaining the data into a staging environment. In the traditional data warehouse, this required an ETL process to pick up data files from a local folder or FTP, and in some cases, a direct SQL connection to source systems to then load into a dedicated staging database. In the new process we will be defining we will be using an S3 bucket to be our new staging environment. Staging data will forever live in raw file data, as any analysis or query needed against this data will be handled via tools like Athena or Elastic Map Reduce which we will cover later. Keeping this data in S3 (known as Azure Blog storage in the Microsoft world) is a cheap and convenient way to store massive amounts of data for a relatively low cost. For example, the first 50 TB is stored at a cost of $0.023 per GB. In most use cases we can assume our data requirements stay under this threshold so if we are assuming 1 TB of data files, we can ball park around $23 a month for storage or $276 a year. Pretty cheap.
If you google the use cases for Big Data, you will usually find references to scenarios such as web click analytics, streaming data or even IOT sensor data, but most organizations data needs and data sources never fall into any of these categories. However, that does not mean they are not great candidates for a Modern Big Data BI solution.

Real Estate Data Warehouse – Accelerating the Staging Process
The script below can be used to build a staging environment for any sort of industry and not just real estate related databases. The specifics of a RE Data warehouse will be covered in future blog post. It will allow you to Accelerating the Staging Process for your Data Warehouse